

How to Melt a Lace Front Wig | Double Melting Method
Due to its outstanding cost-effectiveness and unparalleled natural hairline appearance, the lace front wig has consistently remained the preferred choice among black women. They offer a flawless look and the convenience of easily switching up your hairstyle. To achieve that seamless, undetectable appearance, mastering the art of "melting" a lace front wig is crucial. In this blog post, we'll guide you through the steps to ensure your lace front wig blends seamlessly with your natural hairline, enhancing your confidence and style.

What is a Lace Front Wig
A lace front wig is a type of wig that is designed with a sheer lace base or front that extends from ear to ear. This lace base is made of a fine, nearly invisible material that closely resembles the natural scalp when placed against the skin. The hairs on the lace front are individually hand-tied, creating the appearance of a natural hairline and part.Lace front wigs are commonly used in the entertainment industry, particularly in film and television, where a natural appearance is crucial. However, they are also widely embraced by those who simply want to enhance their everyday style or deal with hair loss issues.
How to Melt a Lace Front Wig
For achieving the perfect natural look, it's recommended to opt for a human hair wig crafted with HD lace. HD lace is lightweight and seamlessly blends with all skin tones, while human hair wigs offer an exceptionally natural appearance. An HD lace human hair wig is a true natural beauty. Additionally, if you purchase a traditional lace wig (unbleached and unplucked), you may need to customize your wig by plucking and bleaching it to achieve a natural appearance. Choose bleached knots wigs and pre-plucked wigs can save your time and effort to the maximum extent. If you don't have this type of wig, you can choose to handle it by yourself. These two articles may help you: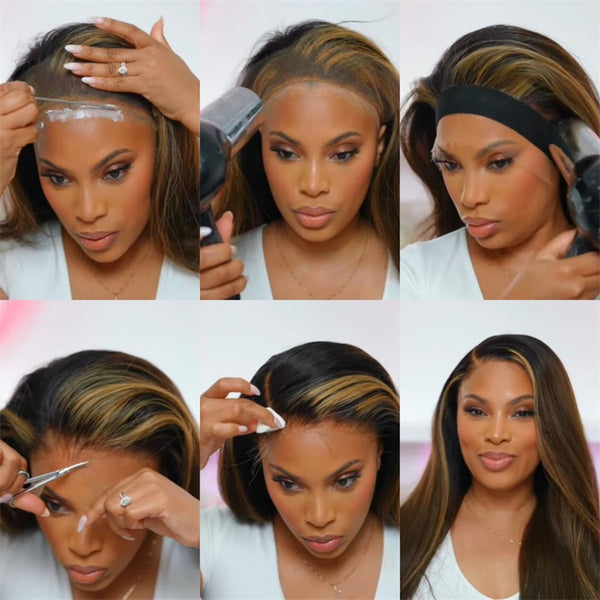
Before applying the wig, make sure to wash it. This helps remove any residue or oils that may affect the bonding of the glue.
Step 2: Use a skin protector
Apply a skin protector, like a sticky liquid adhesive, to your forehead area before applying the glue. This helps the glue to adhere better and keeps it in place for a longer duration. Skipping this step can lead to discomfort and irritation.
Step 3: Apply the glue and spread it evenly
Use a rat tail comb or a sponge to apply the lace glue onto the perimeter of your hairline. Spread it evenly like you're spreading butter to ensure a secure bond. One common mistake is applying too much glue during the installation process. This can lead to a heavy and unnatural appearance, and make it difficult to achieve a seamless blend. Use a thin and even layer of glue for a more natural look.
Step 4: Dry the glue until it turns clear
Use a blow dryer on the cool setting to dry the glue. Wait until the glue turns clear before proceeding to the next step. This is important to ensure a strong hold.
Step 5: Melt the glue into the lace
Once the glue is clear, carefully pull down the lace and press it onto your scalp using a rat tail comb or your fingers. Use the blow dryer once again to melt the glue, ensuring a seamless blend between the lace and your scalp.
Step 6: Apply multiple layers of glue
If you prefer a stronger hold, you can apply multiple layers of glue. We suggests that two layers are typically enough for her and can provide a long-lasting hold. However, if you sweat a lot or engage in intense workouts, you may consider adding more layers for extra security.
Step 7: Use an elastic band for melting
After the glue has dried, add an elastic band around your head to hold the wig in place. Then, use the blow dryer to melt the lace further. Alternatively, you can leave the wig on for about 10 minutes without the blow dryer for the first melt.
Step 8: Trim away excess lace
Once the lace has been melted, use cuticle scissors or an eyebrow razor to trim away any excess lace. This helps achieve a more natural and seamless look.
Step 9: Finish with hair wax and styling
Use hair wax to flatten and style the wig to your desired look. You can also add baby hairs if desired. Finally, use a melting spray or sticky holding spray to give the wig a seamless and flawless finish.

How Long Can You Wear a Lace Front Wig
In summary, you can typically wear a lace front wig for approximately 2-6 weeks before needing to remove it, but this duration can vary based on factors such as wig quality, attachment method, personal preference, scalp health, maintenance, and lifestyle. Regular care and attention will help you make the most of your wig while looking and feeling your best.
Conclusion
Melted lace front wigs provide a seamless and natural appearance that enhances your beauty and boosts your confidence. By following these steps and a high quality human hair lace front wig, you can achieve a flawless look that will have everyone wondering if it's your real hair.
Related Posts
Can You Sleep in a Lace Front Wig?
Can You Reuse Lace Front Wigs?
How to Wash a Lace Front Wig?


