How to Make a Wig for Beginners
Do you know how bundles and lace closure (lace frontal) become wigs? If you are new to wig knowledge or want to have a better understanding of how wigs are made, here in this article you will get complete details about how to make a wig step by step.

How to Make a Wig for Beginners, Step by Step
Measuring Head Size
Knowing and measuring your head size will be necessary for making a wig. Thus, you can choose the right mannequin head size and wig cap size. To create a wig that fits you best.

Prepare Tools for Wig Making
Before starting to sew in a wig, make sure all the wig-making tools have been well prepared.
Tools for making your own wig
Hair weft bundles: 3 bundles will be sufficient
Lace Closure/Lace Frontal
Mannequin or polystyrene head
stocking wig cap or dome cap
T-pins
C-curved needle
Cotton Thread
Metallic marker
Scissors
Put on a Wig Cap on the Mannequin's Head

Make sure you put on your wig cap correctly, tightly, and securely. Place your wig cap right on the dome head. The dome head has a front and back, and the back has a little bump. Place your wig cap in the right direction. Snug the dome head without any wrinkles. Drag the back of the wig cap to the nape area and apply t-pins to secure the wig cap.
Placing the Lace Closure or Frontal on the Wig Cap

You want to make sure your lace frontal or lace closure is placed in the right place, natural, and seamless.
Step one:Place your lace closure or frontal an inch in front of the wig cap. Step two: Find the middle front of the lace frontal closure, place it on the middle front of the wig cap, and pin it down. Step three: Go to the back of the lace part and pin it down in the middle. Step four: stretch the sides of the lace tightly, and if you want to make sure your lace stays flat without clumps, use a T-pin to pin the sides down.
Sew in the Lace Closure or Frontal

Use your C-curved needle to sew in the lace closure or frontal; make it flat and tight; no lift out. 1. Put your thread across the hole of the needle; an arm's length of thread will be good, and then tie a knot. 2. Start sewing the lace frontal or closure from the side. When sewing, you want your needle to go over one layer of the wig cap band and not go through the wig cap band; you don't want to damage the elasticity of the bands. 3. Put the needle between the two strings of thread, and you can make a tight knot. 4. Cut off the extra thread after you finish sewing the lace frontal or closure down.
Use a metallic marker to mark the sewing foundation line. By marking the sewing foundation line, you will know exactly where to sew the bundles without worrying about making it wrong.
Use a metallic marker to draw down the lines from the bottom of the wig cap for your hair weft bundles to sew in. Drawing a horizontal line from bottom to top until the lace frontal/closure part, an inch or a finger apart will be okay.
Sewing in the Bundles
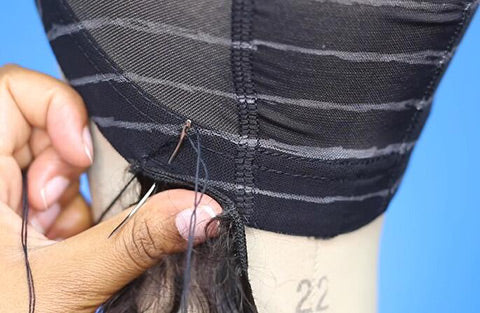
Sew in your hair weft bundles line by line until you finish the whole wig. Sew it from the bottom line, and make sure the needle goes over one layer of the wig cap band and not the whole wig cap band to keep the elasticity of the band. Cut off the thread and hair weft after one line of sewing is finished, and go on sewing the above part.
Cut off Extra Wig Cap under the Lace Frontal or Closure

After finishing sewing in bundles and the closure/frontal, we took the wig off the mannequin head, and then we needed to cut off the excess part of the wig cap that was under the lace closure/frontal.
After reading this article, you will know how to make a wig step by step using hair bundles and a closure or frontal. You can customize your own fitted lace frontal wig or lace closure wig all by yourself. Get our high-quality bundles with closure or bundles with frontal to start the sew-in wig making process.


